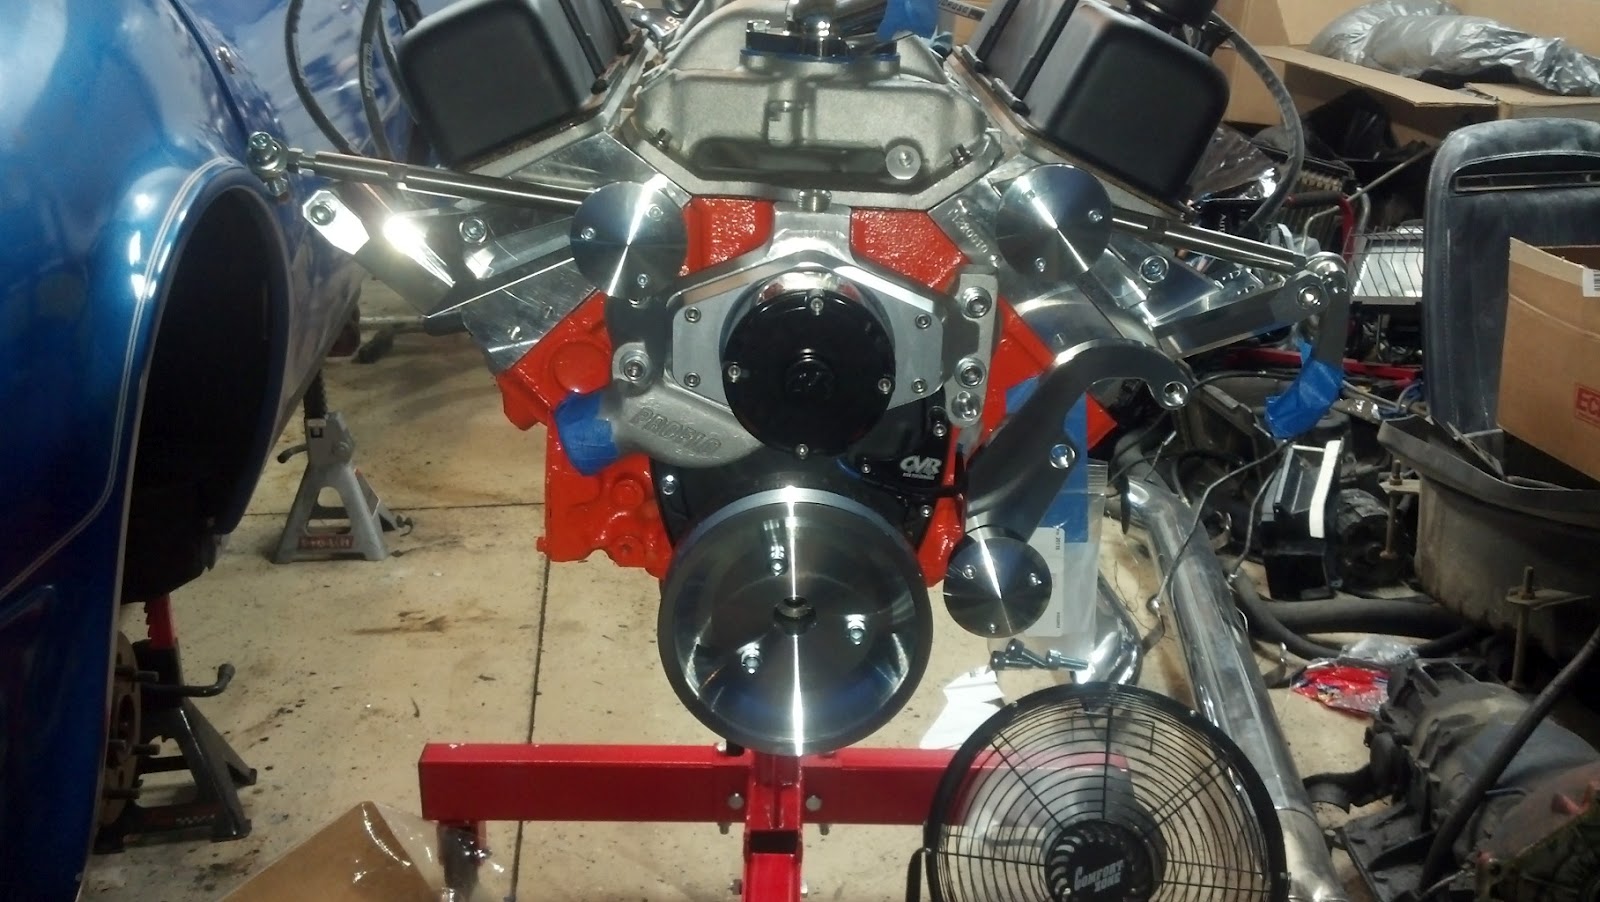
I wasn't sure if I should put them on or not, but I decided to put the A/C compressor and alternator on their brackets. Since something will probably have to change with the A/C bracket because of the idler being too low, it's possible I'll just have to take it back off. I really just wanted to see what it was going to look like all together... Everything is on except the power steering pump. The pump was so tight that I would have had to put it on before the bracket was screwed down to the engine. I sent another email to March before attempting that.
So the compressor has a nose cap and the alternator got a new pulley (6 groove instead of v-belt) and a nose cap. The nut for the alternator is put on insanely tight! I spent all morning on Sunday trying to get the stupid thing off. I had to go out and buy a 15/16" socket. First my neighbor and I tried using an allen wrench and the socket with a pipe wrench, but we couldn't get the thing off. After reading some tips online, we wrapped a belt around the pulley, clamped it as hard as we could in my vise, and then start popping the socket with a breaker bar (since we didn't have an impact wrench). Once we did that it came loose after two tries. Unfortunately while we were trying to get the nut off we dinged the fan on the alternator. It's not really a big deal because it won't cause the fan to hit anything, but it's definitely noticeable since the fan has a flat polished front. Debating about replacing it with a billet aluminum fan or not for $47. Is the look of a fan really that important? Only the wife will tell... =)
Monday, July 9, 2012
Saturday, July 7, 2012
Problems with the Serpentine Kit
I decided to put the water pump and the serpentine kit on today. The electric water pump was pretty straight forward to install (some gasket sealer on the gaskets and 4 bolts). I also put on a new water neck, Fel-Pro gasket, and 180 degree Superstat thermostat. As instructed by the mechanic, I drilled a tiny hole in the metal on the edge of the thermostat to make sure that air can always pass through. The smallest hole that I could drill was 1/16" so hopefully that's not too big. I did some searching and seems like I could have gotten smaller if I had a micro bit set because they come with a special pin chuck. Just ordered one... I'll have to give Sperry a call and find out if I wrecked my new thermostat or not. Oh well, they're only like $8.
Next I moved on to the March Performance Deluxe Outward mount serpentine kit. The crank pulley was just three bolts. Three other main parts went on before I stopped... First I put the alternator arm on, then the power steering bracket, and then finally I put the A/C arm on. Each bracket has an idler. The idlers on the alternator and A/C brackets were added so that I could have the electric water pump. Unfortunately, it appears the idlers are not in the right spots. The belt will end up hitting the water pump. One other odd thing is the power steering pump bracket only has two holes in it. It came with three bolts and the instructions show the bracket having three holes. The new remote reservoir power steering pump has three mounting holes on it. I don't know whether they sent the wrong arm or what.
Just sent March an email detailing the problems. We'll see what they say to fix this...
Saturday, June 30, 2012
Engine and Differential Done!
Picked up my rebuilt differential yesterday afternoon. The guy that rebuilt it said the ring and pinion were in perfect condition, but the clutches and seals were completely shot. So it's still a 3.08 ratio differential. Still wish it was a 3.55, but this saved me $400 and gets me better gas mileage (not that I'm really expecting good gas mileage).
As for the engine... The machine shop broke the camshaft in yesterday morning and I went in after work for the dyno. My dad bought me a new Quick Fuel 680 carburetor. He wasn't convinced that the old quadrajet was good enough for the new engine. The only problem was that the Edelbrock Performer Air Gap intake we'd order was made for the a quadrajet carb. So we had to switch to a different intake that would fit a Holley style carb. Luckily the shop had a Dart Air Gap intake that would work, but unfortunately it's the same size as Edelbrock Performer RPM Air Gap which is taller than I had planned for. C3 Corvettes have very low hood clearances. After reading some forums, it seems like I should be able to fit a 3" air cleaner on this intake if the base drop is enough, but that will some measurements with the engine installed.
Here's the engine on the dyno. Obviously it doesn't have the air cleaner on it, but it also doesn't have the fuel pump (using an electric pump in the test). My exhaust headers are different and my water pump is electric.
As for the engine... The machine shop broke the camshaft in yesterday morning and I went in after work for the dyno. My dad bought me a new Quick Fuel 680 carburetor. He wasn't convinced that the old quadrajet was good enough for the new engine. The only problem was that the Edelbrock Performer Air Gap intake we'd order was made for the a quadrajet carb. So we had to switch to a different intake that would fit a Holley style carb. Luckily the shop had a Dart Air Gap intake that would work, but unfortunately it's the same size as Edelbrock Performer RPM Air Gap which is taller than I had planned for. C3 Corvettes have very low hood clearances. After reading some forums, it seems like I should be able to fit a 3" air cleaner on this intake if the base drop is enough, but that will some measurements with the engine installed.
Here's the engine on the dyno. Obviously it doesn't have the air cleaner on it, but it also doesn't have the fuel pump (using an electric pump in the test). My exhaust headers are different and my water pump is electric.
Alright, so dyno results for my new 383 SBC... 421.5 HP and 478.7 ft. lbs. torque
Here's Scott the mechanic doing some final adjustments before we started doing the testing. During the dyno he adjusted the distributor timing to get the optimal output.
Wednesday, June 20, 2012
Needed a break over the weekend
I've spent a lot of time these past couple weeks doing homework, so when I had a bit of down time over the weekend I decided to work on the car a bit. The passenger side door has slowly been progressing. Weekend before last I got the window cleaned up and ready to be put back in and got all the grime cleaned off the lifting components. This weekend I decided I would finish the insulation...
I had already coated the door in several layers of rust reformer and primer. The outer layer is actually rubberized undercoating. The idea being that will help deaden sound, keep dirt from sticking, and also seal it from rusting again. The next step was just to apply the Thermotec sound/heat shielding like I already had done of the driver's side (looks kinda cool actually). This time it went a lot smoother... No mis-cuts. Next thing to do is reinstall the window, then finish the power locks.
Getting a bit excited though... The engine should be done in the next two days! Will be ordering the transmission after I get back from my vacation. Plenty to do before then.
I had already coated the door in several layers of rust reformer and primer. The outer layer is actually rubberized undercoating. The idea being that will help deaden sound, keep dirt from sticking, and also seal it from rusting again. The next step was just to apply the Thermotec sound/heat shielding like I already had done of the driver's side (looks kinda cool actually). This time it went a lot smoother... No mis-cuts. Next thing to do is reinstall the window, then finish the power locks.
Getting a bit excited though... The engine should be done in the next two days! Will be ordering the transmission after I get back from my vacation. Plenty to do before then.
Friday, June 15, 2012
Ok... Engine is REALLY being built now
So it really wasn't Sperry's fault that they couldn't build the engine yet... I contacted Dart to make sure the order was in and to find out what the heck was going on with the cylinder heads. They informed me that it was in fact their fault but didn't give me much more information. I felt bad going around Sperry like that, but he wasn't giving me much choice. Hearing the same statement every other week (regardless of whether or not it was exactly what he was told) really starts getting suspicious. Honestly, he should have just called me weeks ago and suggested going to a different part. Only after 9 weeks, 7 weeks on back order (yeah, he told me the order didn't go in until 2 weeks after I put the order in for the engine), did he suggest it? Come on...
Anyway... It's all resolved now. He suggested going to an Edelbrock head that would be about the same price as the Dart SHP's we'd picked out. The difference would be that the Edelbrock's would be 200cc instead of 180cc so the HP would be higher but also at a higher RPM (not very good for street cars). When I had talked to Dart, I asked if it would be possible to switch to their Pro 1 line. They actually said they had Pro 1 180cc heads in stock and they could easily make the change. After discussing it with Sperry for a little bit (and doing some research on the internet before going out there), I decided to switch to the Pro 1's.
Now Pro 1's are more expensive (the wife was not happy with that) because it's a different type of aluminum that's harder to cast than the SHP. From what I understand, the flow characteristics of the Pro 1's are much better than the SHP's. When I originally put together my engine parts, the Pro 1's were actually the heads I'd chosen (based on a SBC building book I'd read). So according to Dart, my Pro 1 cylinder heads just needed a little machining and they should ship out today. They should be here early next week (Dart is based in Michigan).
As of last night, my bare block was ready to be built and my rotating assembly was being double checked for balance. The short block should be complete today!
Anyway... It's all resolved now. He suggested going to an Edelbrock head that would be about the same price as the Dart SHP's we'd picked out. The difference would be that the Edelbrock's would be 200cc instead of 180cc so the HP would be higher but also at a higher RPM (not very good for street cars). When I had talked to Dart, I asked if it would be possible to switch to their Pro 1 line. They actually said they had Pro 1 180cc heads in stock and they could easily make the change. After discussing it with Sperry for a little bit (and doing some research on the internet before going out there), I decided to switch to the Pro 1's.
Now Pro 1's are more expensive (the wife was not happy with that) because it's a different type of aluminum that's harder to cast than the SHP. From what I understand, the flow characteristics of the Pro 1's are much better than the SHP's. When I originally put together my engine parts, the Pro 1's were actually the heads I'd chosen (based on a SBC building book I'd read). So according to Dart, my Pro 1 cylinder heads just needed a little machining and they should ship out today. They should be here early next week (Dart is based in Michigan).
As of last night, my bare block was ready to be built and my rotating assembly was being double checked for balance. The short block should be complete today!
Monday, June 4, 2012
Getting Really Aggrevated With Engine Shop
So I put the order in for my engine at Sperry Engines on Wednesday, April 11, 2012. After I put the order on the books, I asked how long it would take. I was told 2-3 weeks by the owner. After not hearing a word three weeks after the order I called and they said they hadn't received the cylinder heads from Dart yet, but they're getting a Dart shipment in next week and they should be on there. Week and a half later I called again, same story. So I gave them another week and a half and I got the same story and he said he had called Dart about. I called a couple days later and told him to call me when the engine was getting ready for the dyno so I could see that.
Called again today, almost two weeks since the last time I called when I was assured I was at the top of the build list, and I got "the cylinder heads aren't in from Dart, he's calling today". Seriously! Had the heads been ordered when I put my order in from any catalog, they would have shown up in a week or at the most two weeks. And they expect me to believe that they're actually talking to Dart about any of this when it's been almost 5 weeks since they said they called the first time?! This Wednesday, June 6, 2012, will be 8 weeks since I put my order in! That's a far cry from 2-3 weeks!
Sunday, June 3, 2012
Undercoating Complete! Finally...
Still no word on the engine or the differential... Calling tomorrow. The 2-3 weeks has turned into 7-8 weeks. Haven't ordered the new transmission yet (considering a 700R4 now that I'm not changing the differential ratio, but have to check into the cost of shortening the drive shaft).
So I've been working the last few weeks trying to get all the dirt, grease, and rust off the underside of the car and the frame. Took the spare tire holder off and removed as much as I could. Used a wire brush in my drill to cleaner most of it and used a grinder on the frame under the doors. Once cleaned, I used rust dissolver anywhere I could find rust I couldn't get to. Then I put a coat of rust reformer over everything. Once the rust reformer was set (24 hours), I put on a coat of primer then a layer of undercoating. Finally, on places that would be around high heat (near engine, transmission, and exhaust), I put a coat of high heat engine paint that's gas and oil repellent. I went back and touched it up a bit after looking at my pictures...
While doing the undercoating, I had to remove the side pipes. They couldn't be removed with a wrench unfortunately. Even after I did some liquid wrench coatings over 48 hours. The bolts holding onto to frame would just spin whenever I tried to remove the nut. So, I ended up cutting the bolts with a reciprocating saw. I'll have to come up with something to replace the strange "t-bolt" that they used, but that shouldn't be too difficult to do. Now that the pipes are off, that gives me a chance to clean them up properly and put the heat shielding on. It turns out the side pipes a bit banged up, probably from about 24 years of use, but they still look decent enough to use. In a few years I'll probably have to replace them.
So I've been working the last few weeks trying to get all the dirt, grease, and rust off the underside of the car and the frame. Took the spare tire holder off and removed as much as I could. Used a wire brush in my drill to cleaner most of it and used a grinder on the frame under the doors. Once cleaned, I used rust dissolver anywhere I could find rust I couldn't get to. Then I put a coat of rust reformer over everything. Once the rust reformer was set (24 hours), I put on a coat of primer then a layer of undercoating. Finally, on places that would be around high heat (near engine, transmission, and exhaust), I put a coat of high heat engine paint that's gas and oil repellent. I went back and touched it up a bit after looking at my pictures...
While doing the undercoating, I had to remove the side pipes. They couldn't be removed with a wrench unfortunately. Even after I did some liquid wrench coatings over 48 hours. The bolts holding onto to frame would just spin whenever I tried to remove the nut. So, I ended up cutting the bolts with a reciprocating saw. I'll have to come up with something to replace the strange "t-bolt" that they used, but that shouldn't be too difficult to do. Now that the pipes are off, that gives me a chance to clean them up properly and put the heat shielding on. It turns out the side pipes a bit banged up, probably from about 24 years of use, but they still look decent enough to use. In a few years I'll probably have to replace them.
Subscribe to:
Posts (Atom)