If you're curious as to what my plans were for the car and what they still are, check out the Project Plans page I just created. It has a list of the projects I have done, am working on, and am still planning to do. The list is pretty granular, but I've left out some specific details. For example, how I had planned to just update the speakers, then later come back and do the subwoofer and stereo upgrade (it all ended up happening at once). In the list of projects, those are just list under a single project. Another good one is how I had originally planned to just insulate the front of the car, but then a good deal on carpeting came around and I decided to insulate the rest of the car... Anyway, you may or may not be interested in the specifics, but it's kind of interesting see how much there is.
Just taking a short break from school work. Been working on getting my final projects and homework done for a week straight, and now I have to prepare for my finals. I get back into studying for them tomorrow. This is the last week of the spring semester. I'll be working on the car next weekend. You can be sure of that!
Saturday, April 28, 2012
Tuesday, April 17, 2012
Delayed...
Well... Did some finances today... The transmission change is going to have to wait. I know I'd said previously that no other projects would be started this year after this one is complete, but can't even complete this one! Looking at the upcoming bills and what I currently am paying off, there's just no way I can I justify buying the transmission responsibly. It means the car will be sitting without an engine for a long time, but it's better than being in debt. I'll just keep working on what I have until I feel I'm able to handle that size of a purchase (A/C system and the interior stuff). My goal of driving the car at the end of May is likely when I'll be able to make the purchase.
Rear Differential Removed for Rebuild
The code for the rear differential indicates that the ratio for this car is 3.08, pretty common actually for the Corvettes made around '75. This ratio is referred to as an "economy" ratio, so it's meant for higher speeds but is bad for initial acceleration. So with a 3 speed automatic transmission, this was an attempt at getting better gas mileage on the highway.
With the transmission out of the car, my wife and I have decided to upgrade to an automatic transmission with overdrive (a level 2 200-4R from Bowtie Overdrive, I'll talk about that later after I get the order in). Adding the overdrive gear eliminates the need for the "economy" differential ratio. Researching ratios, and talking with my mechanic, I've decided that a ratio 3.55 is good for this car. It will get much better off-the-line acceleration, and still have acceptable highway response. I had thought about going to 3.70, but after discussing with the mechanic, that was completely taken out of the equation because highway driving is supposedly not good with this ratio or higher.
A mechanic at the shop that's doing my engine does differential rebuilds. He's agreed to rebuild mine with the different ratio so I spent the night removing it from the car. By the way, it's heavier than you think it's going to be...


Saturday, April 14, 2012
The Engine Is Out!
With help from my dad and my father-in-law, I was able to get the engine and transmission out of the car. The engine wasn't too bad. My dad and I spent the morning removing the fuel pump, starter, headers, distributor, and spark plugs. Seeing the condition of the spark plugs and one of the cables, it's amazing the engine ran! We disconnected the transmission from the engine to make it easier to remove and used hardened bolts to secure the engine hoist to the bolt holes on the ends of the cylinder heads.
Getting the transmission out was a real treat. We didn't rent a transmission jack and attempted to just use a large floor jack. To get the transmission out, I got in the engine compartment and pulled the transmission out by hand. Not a great plan... That sucker is heavy! Not to mention there was still a lot of transmission fluid in it. I had no where to put the transmission down so I just stood there holding the transmission while my father-in-law, re-setup the engine hoist and got a strap. We should have had it ready, but our weight estimate for the transmission was a bit off...
So now the question... Rebuild, recondition, or replace the transmission? Just reconditioning by replacing gaskets and the filter so I don't have to spend as much right now is very attractive from the cost perspective. The engine is expensive enough! The wife actually already gave the go ahead to replace, so I'm investigating that now (it's between the TH200-4R and the TH700-R4). And to answer the question you're probably thinking, yes... those are automatics (and they have overdrive). I'm being nice and compromising so that my wife can drive it.


Thursday, April 12, 2012
New Engine Ordered
Well, I really wanted to build the engine myself, but multiple people thought I should just have an engine shop put it together so that they test and adjust it (also saves me time I don't really have). As much as I want to do the build, I completely understand why I should have the shop do the build. Anyway, had a meeting with the shop on Monday and discussed reusing the engine block along with the different engine options. Everything from doing a straight 350 rebuild to doing a high performance 383.
After about and hour of talking, I had a good idea of pricing and what to expect out of the different size engines. Since the car is so heavy, a high torque engine will be very beneficial. A 383 is very well known as having lots of torque. From the books I've read, and from talking with the mechanics, the 383 is a very popular choice for 350 blocks. Went back today with a list of parts I had compiled to use. We went through them one-by-one until we had the best engine for the money that would fit in the stock car, with good power, and be a good driveable car.
Here's the main stuff I ended up going with...
In 2-3 weeks I'll have a lighter engine with a 9.98:1 compression ratio that should peak about 386 hp and 423 ft-lbs torque. That's about 40 hp and 10 ft-lbs torque less than if I didn't have take the low hood into account. I used a computer simulation to get those numbers. It's going to be an orange block, natural aluminum heads, and a powder coat black dress-up (valve covers, timing chain cover, air filter cover). So basically, it looks almost exactly like this economy 383 build (except I'll have more stuff on the front of the engine). Maybe one day I'll get the after-market hood I want and swap out the top end for the taller stuff, but lots of stuff to do before then...
After about and hour of talking, I had a good idea of pricing and what to expect out of the different size engines. Since the car is so heavy, a high torque engine will be very beneficial. A 383 is very well known as having lots of torque. From the books I've read, and from talking with the mechanics, the 383 is a very popular choice for 350 blocks. Went back today with a list of parts I had compiled to use. We went through them one-by-one until we had the best engine for the money that would fit in the stock car, with good power, and be a good driveable car.
Here's the main stuff I ended up going with...
- New 350 4-bolt mains short block (383 rotating assembly with flat-top pistons) - Ended up being cheaper than reusing the block I have
- Dart aluminum cylinder heads - higher performance and lightens up the engine
- Edelbrock Performer Air Gap - suggested upgrade by the mechanic, and it still fits under the stock hood with a regular air cleaner
- Comp Cams Xtreme Energy Hydraulic Flat Tappet Cam - picked from a book I read with help from the mechanic to make the car street driveable
- Comp Cams Aluminum 1.6 rockers - size and type picked from the book, but the mechanic picked out the actual rockers (I had picked some expensive ones...)
- MSD Street Fire Distributor - originally picked the Pro Billet HEI, but the mechanic didn't think it was worth it for me since this is a street driver
In 2-3 weeks I'll have a lighter engine with a 9.98:1 compression ratio that should peak about 386 hp and 423 ft-lbs torque. That's about 40 hp and 10 ft-lbs torque less than if I didn't have take the low hood into account. I used a computer simulation to get those numbers. It's going to be an orange block, natural aluminum heads, and a powder coat black dress-up (valve covers, timing chain cover, air filter cover). So basically, it looks almost exactly like this economy 383 build (except I'll have more stuff on the front of the engine). Maybe one day I'll get the after-market hood I want and swap out the top end for the taller stuff, but lots of stuff to do before then...
Saturday, April 7, 2012
It's a Good Cast!
Finally got the the timing gear cover off to look for the casting numbers (the 010/020 numbers). It turns out this block is one of those rare high nickel/tin content, 2-bolt main blocks. Once I got all the components and brackets off the engine, I discovered the cylinder head gaskets and the timing gear cover gasket are leaking (possibly the intake manifold gaskets as well). It was necessary to determine if the block was good to reuse to see if it was worth the effort to repair the seals. Even though it's a 2-bolt main, it's a strong cast and converting to splayed main bolts would definitely make the block worth-while. Going to make an appointment with a machine shop to discuss options with it and prices for a clean-up/rebuild. We'll see which is better... Crate engine, short block, long block, bare block build, or the rebuild.


Oh, and the verdict on the radiator support is that it's dead... New one ordered.


Oh, and the verdict on the radiator support is that it's dead... New one ordered.
Thursday, April 5, 2012
Got Lots Out!
So needed to get the radiator support out before the weekend so it could be looked at by a welder. Since it's Easter weekend, there's probably going to be a bunch of sales with the Corvette catalogs (know of one already). Anyway, after dinner I started unbolting and pulling...

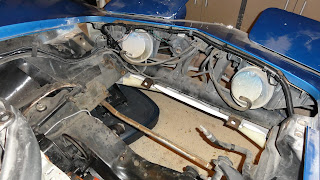


Well, I got most of the hoses for the A/C system out, but still have the main refrigerant lines and the metal lines still in the car. Getting the A/C coolant lines out was annoying. Antifreeze didn't completely drain from the hose and when I pulled it off the evaporator all the antifreeze came running out on me. All over my arm and shirt. Of course I immediately wiped myself down and got a new shirt... Nothing like having poison on you! Anyway, here's what the side looks like now, the hose on the left is the main refrigerant line.

And the pile of stuff removed has grown... Not having the radiator shroud will be awesome! That thing is a huge PITA to deal with. Will have to get the radiator support checked out tomorrow.

Big Accessory Project Started Before Finishing Interior
Well, I thought I had all the parts I needed for the accessory and radiator upgrade. I may need to get some more of the smaller stainless braided hose or some more clamps, but everything I ordered is waiting for me to put it together. I thought I'd be able to remove all the stuff over the week and then put most of the new stuff together on Saturday. Was I wrong...
Before starting, I was concerned about the R12 freon in the car. Did some research, found out it is against the law to vent the freon and that you needed a certified person to use a special tool to extract it. I was about to make some phone calls to see if I could get someone to come to my house and do it, but decided to inspect the system first. It wasn't very surprising, since the system hasn't worked in years, that I found a big tear in the tubing next to the A/C compressor on the underside of the hose. The system hasn't had any freon in it for years and it's possible that with a new hose the system could have worked. I was hoping to have this kind of luck with the rest of the project.


Before starting, I was concerned about the R12 freon in the car. Did some research, found out it is against the law to vent the freon and that you needed a certified person to use a special tool to extract it. I was about to make some phone calls to see if I could get someone to come to my house and do it, but decided to inspect the system first. It wasn't very surprising, since the system hasn't worked in years, that I found a big tear in the tubing next to the A/C compressor on the underside of the hose. The system hasn't had any freon in it for years and it's possible that with a new hose the system could have worked. I was hoping to have this kind of luck with the rest of the project.
Once I discovered that there was no freon in the system, I went to remove everything from the car. First, I drained the radiator. Which has a lot of force coming out initially. So make sure your container is in the correct position. Then I had my wife help me remove the hood so I could get at the condenser and radiator. As soon as I removed the condenser, I hit a bad problem. The lower part of the radiator support is rusted through. The rust extends up the support about 8 inches. The support will either need a new section of metal welded to it or be completely replaced. The support luckily is just bolted onto the frame, which makes it not too bad to replace. I'm really hoping I can find someone to fix it cause a new one is $300.
Well, regardless of the rust, everything still has to come out. So... COMMENCE THE REMOVAL! Here's what I've got out so far... A/C condenser, A/C compressor with bracket, alternator with bracket, radiator fan with clutch, and several cooling hoses. Still need to remove the radiator with shroud, water pump, thermostat, A/C evaporator with ducts, A/C wiring harness and vacuum hoses, and coolant overflow tank.
Subscribe to:
Posts (Atom)