Well, I started assembling the fuel line kit tonight. Got the lines connected to the carb and then figured out the hoses I got for the heater aren't going to work. Basically, because of the way the Holley style carb has its fuel lines, the line goes right over the intake fitting making it impossible to put a hose on the barb. The only way to do it would be to use expensive AN hoses and fittings with different angle adapters. I was second guessing my choice for the hoses anyway. After attempting to use the pseudo-braided hose on the radiator, it left me with a low opinion of these hoses and clamps.
So I ordered a lot of different angle fittings to just try different setups. I went with black braided hose instead of stainless because it's considerably lighter and these hoses are pretty large. The fittings will be nickel colored which will match the compressor, condenser, and evaporator A/C lines.
Also, as far as the A/C line fittings go... Vintage Air called me this morning. He said, "So it looks like we're going to send you the different fitting. I think that will be the easiest route". I wanted to say "No sh*t...", but I stayed polite and said thank you for the help instead. He also said that I could get the fittings crimped at a Napa store and that it shouldn't be done with a hydraulic crimper because it will damage the fitting (which is actually opposite to what I'd read online, so that was good to know).
Wednesday, September 12, 2012
Tuesday, September 11, 2012
The Air Cleaner Post
Ok, I said I'd post about the air cleaner but then never did. Here's what I did...
I ordered the Spectre Cowl Induction Air Box with the flow-thru top air cleaner. I had been debating about this because it was pretty expensive and I wasn't sold on the whole cowl induction thing. So after posting to Corvette Forums about it and seeing plenty of other people still having this problem and often custom making air boxes, I decided to do a little more research. I could have gotten an L88 hood, but I don't like the look of those things. Makes the car kinda ugly.
The Spectre air box has a 1.7" drop base and claims that you only need 2.5" from the carb flange to the hood. This is 1/2" lower than the Proform with it's 1.5" drop base. Since the 3" just touched the hood, it seemed like 2.5" should be about perfect.
When the cleaner came I was impressed with the quality packing and how nice it actually looked. I always figured Spectre for kinda cheesy looking stuff. The problem was the cleaner didn't fit. It was hitting the distributor even though it has a special cut-out to avoid it. This is a standard 350 block, so maybe my carb sits a little back in relation to the block? I don't know. So anyway, then we discover that it was actually hitting the two bolts on the ends of the carb. Just barely, but it was making it so the cleaner wouldn't sit flat.
Disappointed that it didn't fit out of the box and I had spent so much time looking into it, I was determined to make it fit. So, I got out some thick duct tape, a block of wood, and a ball peen hammer. A few well placed hits and the cleaner could sit down on the carb. A lot of hits later, it was also able to go in next to the distributor. Next was the hood test...


My wife helped me get the hood back on the car after I removed the cowl induction flapper and its wiring. It had been disconnected for years anyway, but it needed to be removed because the air box is nearly a sealed compartment (not sealed in the corners). Moment of truth....
The hood closed. And from the look of it, the new air box sealed perfectly with the hood. I was extremely happy...

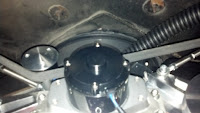
That was until I started installing the TV Made Easy system from BTO. The system is actually pretty large, and bracket for attaching the throttle cables actually just hits the air cleaner. I couldn't believe it. There was a lot of extra metal on the bracket at the top, so I decided to trim it a bit with my grinder. A trip to Menards for a new blade and a tool to remove the blade later and I had the bracket ground down. Now it fits! Yey! Lets not have any more clearance issue with the air cleaner, okay?!


Of Course The A/C Couldn't Be That Easy!
Lots of fun with the Vintage Air SureFit system for 1975 Corvette with factory air conditioning...
So according to Vintage Air, the kit is supposed to go in with only minor modifications to the car for the new duct work... Riiiight!


Alright I didn't have any problems installing the duct work adapters and converting the controls. Now on to the rest of the kit. First let me mention one thing. I ordered the kit directly from Vintage Air instead of buying it through Ecklers or Zip because I was getting the March Performance serpentine kit as well. I ordered the regular kit with three changes. First, I had them remove the mounting bracket. Second, I had them provide a compressor with a serpentine pulley instead of a v-belt. Finally, I had them polish the compressor so that it would match my polished alternator. Nothing big right? Anyway ditching the bracket pretty much paid for the polishing, so it was all good.
The compressor went on the March bracket fine. I had to get a longer bolt for the adjustment rod, but March provided that for free. So the next thing after the compressor was the evaporator.
Before you put the evaporator in the car, you have to put some pipes on it and do some bracket prep (including drilling some holes in the firewall using a provided template). Got everything ready and then went to put the thing in the car. It didn't fit! There's a bracket for bracing behind the passenger side dash on convertibles and a couple other models that prevents the evaporator from going in. The bracing helps reduce cowl shake. So I gave Vintage Air an email, here's what they said...
Ok, so I used a new Dremel and cut off the bracket. Whatever... The evaporator finally fit in. Well, on to the cover that goes on the firewall. The holes they had me drill for that were both 1/2" off (and yes I checked like four times before drilling). It's not only that, but there's a notch in the cover for around the mounting bolt for the evaporator. That was off a bit too, so the Dremel came to the rescue again and I made the cut-out bigger. There was one hole that actually fit though and that was an OEM one... Now you're probably thinking I just didn't have it line up right. If I had lined up the cut-out with the mount bolt, it would have been even farther off.


Next was the condenser install. I had just finished installing a brand new radiator and radiator support. The support kind of sucked to install by the way... It's supposed to line up with existing holes in the radiator support and you're supposed to use the OEM bolts. Well guess what?! Bolt holes didn't line up and in one case there wasn't even one close so I had to drill a new one. I also had to go get a longer bolt for one. It's in now though.


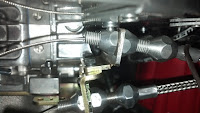
On to my latest call with Vintage Air. The hose kit they set me is a "mod" kit. Which means the hose didn't come put together. Wouldn't be a big deal except that you have to have a $5k tool to crimp the fittings on and at least one of the fittings isn't the right angle! I double checked all my documentation and it looked like the right kit according to the title and everything. With the #10 hose fitting on, I wouldn't be able to shut the hood.


This of course prompted me to call Vintage Air and see what was up. They initially told me that I need to rotate the compressor so the fitting would be pointed toward the passenger side fender wall. I immediately told him that it wasn't going to work because it would hit the wall. He said I needed to send him pictures of it. So I did... Got a call from him today about it. He proceeded to tell me again that I just needed to rotate the compressor because the mounting bracket I had wasn't theirs and theirs puts it at a different angle. He also said they've had this problem a few times in the past and that's what it took to fix it. I told him that I really didn't think it was going to work and that I still needed to put the radiator overflow tank in and that was going to take up that space. He insisted that I try changing the mounting and rotating the compressor with the radiator overflow tank in.
I got home, put the overflow tank in, and didn't bother with messing with the mounts. Instead I got the tape measure out. The fitting requires over 4-1/2" inches of clearance and that's without a hose installed, so it would be more like 6" or 7". The distances between the compressor and the fender wall are typically less than 4". One spot gets to 4-3/4", but surprise! The overflow tank and hose is there and it reduces clearance back below 4" again! There is no possible situation where this fitting would have ever worked regardless of the mounting bracket. The compressor cannot go more toward the engine because of the cylinder head covers, and it cannot be lowered because of the exhaust manifold. In other words, the tech from Vintage Air appears to be full of it...


Here's the odd thing... I tried to find the hose kit on their website. It doesn't exist! And to top it off the two hose kits they have for the 1968-1976 Corvettes with factory air conditioning have the correct angle fittings. Plus one of the kits is the "standard" kit and the fitting are already crimped on! My question to the tech was, what the heck is this kit and why did I get it instead of the standard kit that would have worked? I've asked that twice now... He seems to be avoiding the question.
So my experience with Vintage Air so far is less than desirable. Other companies have been better. Lokar customer support is amazing. Bowtie Overdrives is pretty good except when their main support guy is gone for a week. March Performance is good when their support rep is in. Somehow I always need help when people are on week vacations.
All I can say about the "Surely doesn't Fit System" from Vintage Air is that it better work really well... Can you tell I'm pissed off?
So according to Vintage Air, the kit is supposed to go in with only minor modifications to the car for the new duct work... Riiiight!


Alright I didn't have any problems installing the duct work adapters and converting the controls. Now on to the rest of the kit. First let me mention one thing. I ordered the kit directly from Vintage Air instead of buying it through Ecklers or Zip because I was getting the March Performance serpentine kit as well. I ordered the regular kit with three changes. First, I had them remove the mounting bracket. Second, I had them provide a compressor with a serpentine pulley instead of a v-belt. Finally, I had them polish the compressor so that it would match my polished alternator. Nothing big right? Anyway ditching the bracket pretty much paid for the polishing, so it was all good.
The compressor went on the March bracket fine. I had to get a longer bolt for the adjustment rod, but March provided that for free. So the next thing after the compressor was the evaporator.
Before you put the evaporator in the car, you have to put some pipes on it and do some bracket prep (including drilling some holes in the firewall using a provided template). Got everything ready and then went to put the thing in the car. It didn't fit! There's a bracket for bracing behind the passenger side dash on convertibles and a couple other models that prevents the evaporator from going in. The bracing helps reduce cowl shake. So I gave Vintage Air an email, here's what they said...
I have talked to our R&D tech and to one of our Dealer/Installers in Houston Texas who has done several of the 68-76 Corvette installs. None of the cars we had in-house during the design had the support brackets but my installer stated some of them did and some didn’t. He did have to remove the two lower tabs with the bolts in them for the evaporator to fit. He also stated some of the cowls are formed different than others – he has had to trim insulation back on some for the servo motor to clear and slightly modify/tweak the evaporator bracket for the bolt to go in.Seriously? Their research is kinda piss poor then... The other system out for C3's (which is sold by Corvette America) called Perfect Fit takes the brackets into account. They point them out in the instructions. Honestly, wouldn't you think they'd put a note in the instructions and even on the catalog information about the models with install issues?
Ok, so I used a new Dremel and cut off the bracket. Whatever... The evaporator finally fit in. Well, on to the cover that goes on the firewall. The holes they had me drill for that were both 1/2" off (and yes I checked like four times before drilling). It's not only that, but there's a notch in the cover for around the mounting bolt for the evaporator. That was off a bit too, so the Dremel came to the rescue again and I made the cut-out bigger. There was one hole that actually fit though and that was an OEM one... Now you're probably thinking I just didn't have it line up right. If I had lined up the cut-out with the mount bolt, it would have been even farther off.


Next was the condenser install. I had just finished installing a brand new radiator and radiator support. The support kind of sucked to install by the way... It's supposed to line up with existing holes in the radiator support and you're supposed to use the OEM bolts. Well guess what?! Bolt holes didn't line up and in one case there wasn't even one close so I had to drill a new one. I also had to go get a longer bolt for one. It's in now though.


On to my latest call with Vintage Air. The hose kit they set me is a "mod" kit. Which means the hose didn't come put together. Wouldn't be a big deal except that you have to have a $5k tool to crimp the fittings on and at least one of the fittings isn't the right angle! I double checked all my documentation and it looked like the right kit according to the title and everything. With the #10 hose fitting on, I wouldn't be able to shut the hood.


This of course prompted me to call Vintage Air and see what was up. They initially told me that I need to rotate the compressor so the fitting would be pointed toward the passenger side fender wall. I immediately told him that it wasn't going to work because it would hit the wall. He said I needed to send him pictures of it. So I did... Got a call from him today about it. He proceeded to tell me again that I just needed to rotate the compressor because the mounting bracket I had wasn't theirs and theirs puts it at a different angle. He also said they've had this problem a few times in the past and that's what it took to fix it. I told him that I really didn't think it was going to work and that I still needed to put the radiator overflow tank in and that was going to take up that space. He insisted that I try changing the mounting and rotating the compressor with the radiator overflow tank in.
I got home, put the overflow tank in, and didn't bother with messing with the mounts. Instead I got the tape measure out. The fitting requires over 4-1/2" inches of clearance and that's without a hose installed, so it would be more like 6" or 7". The distances between the compressor and the fender wall are typically less than 4". One spot gets to 4-3/4", but surprise! The overflow tank and hose is there and it reduces clearance back below 4" again! There is no possible situation where this fitting would have ever worked regardless of the mounting bracket. The compressor cannot go more toward the engine because of the cylinder head covers, and it cannot be lowered because of the exhaust manifold. In other words, the tech from Vintage Air appears to be full of it...


Here's the odd thing... I tried to find the hose kit on their website. It doesn't exist! And to top it off the two hose kits they have for the 1968-1976 Corvettes with factory air conditioning have the correct angle fittings. Plus one of the kits is the "standard" kit and the fitting are already crimped on! My question to the tech was, what the heck is this kit and why did I get it instead of the standard kit that would have worked? I've asked that twice now... He seems to be avoiding the question.
So my experience with Vintage Air so far is less than desirable. Other companies have been better. Lokar customer support is amazing. Bowtie Overdrives is pretty good except when their main support guy is gone for a week. March Performance is good when their support rep is in. Somehow I always need help when people are on week vacations.
All I can say about the "Surely doesn't Fit System" from Vintage Air is that it better work really well... Can you tell I'm pissed off?
Monday, September 10, 2012
Redesigning Radio Setup
I've been waiting for Retrosound to put out the Model Two since last year. Originally it was supposed to be released at the beginning of this year. You may have seen some of my earlier posts where I was designing the speaker/sub enclosure. I had designed it assuming that I would be able to use the speaker outputs from the radio to power a pair of component speakers. Original Retrosound had said the Model Two would have 50Wx4 RMS, but they have since changed it and it's only 25Wx4 RMS. I was comfortable sending 50W to my 100W component speakers, but 25W is just too low...
Disappointed in the change in wattage, I started looking into other retro radios. Unfortunately, the other radios out there aren't any better. In fact they're all lower and only advertise the peak power ratings. So my only option to get the quality radio that looks good would be to get an amplifier to power my component speakers. After several hours of looking through different amplifiers and trying to figure out how I could integrate a different sub into this tiny car, I finally came up with two options. I can either buy a different amp that can power the rear speakers as well as the sub, or I can get a tiny amp that just powers the components. The best little amp that I've found is the Rockford Fosgate PBR300X2 and the PBR500X1. The stereo 300W model is small enough that it would fit under the glove compartment tray. There are lots of models that can power two speakers a sub, the problem becomes finding one small enough to fit in my space... Remember my design goal was to make it as blended into the car as possible.
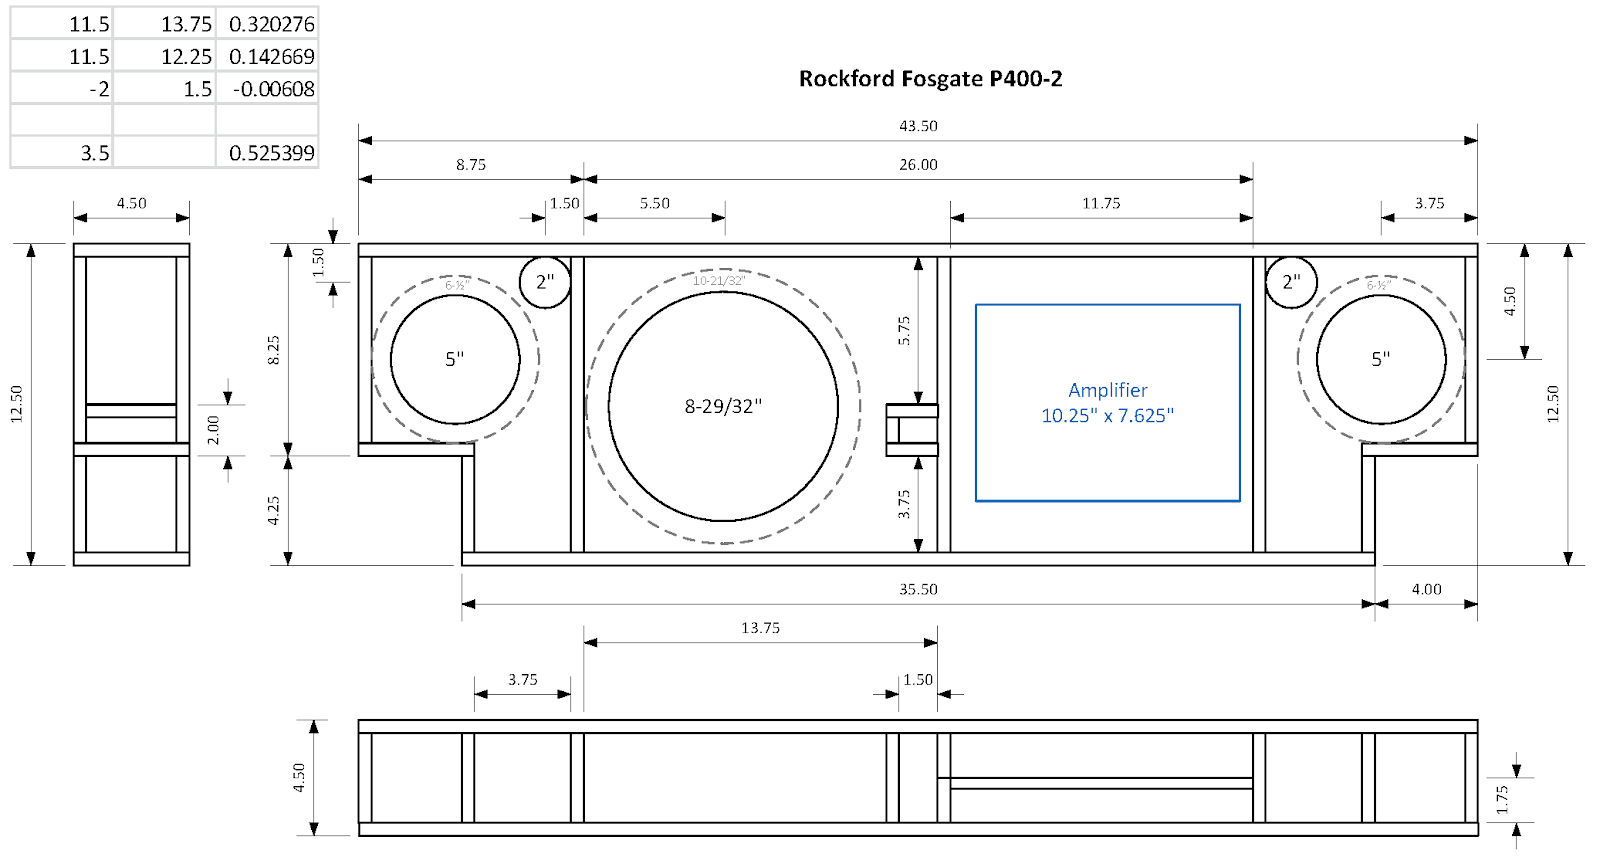
Here's my new enclosure design. I've given up on the dual sub design to my the enclosure easier to build and to support a larger amp if necessary. Also, I was dumb and bought a SVC sub instead of a DVC so I'm stuck at 4 ohm and unless I bridge an amp, 4 ohm loads are not very efficient. Oh well... The new design also lets me mount the component speaker cross-over to the sides. The volume shown assumes a 15% increase by using batting. The sub isn't more centered so that I can mount the light on the front.

On a separate note, the hood clearance issues have been fixed! Pictures and an explanation later!
Disappointed in the change in wattage, I started looking into other retro radios. Unfortunately, the other radios out there aren't any better. In fact they're all lower and only advertise the peak power ratings. So my only option to get the quality radio that looks good would be to get an amplifier to power my component speakers. After several hours of looking through different amplifiers and trying to figure out how I could integrate a different sub into this tiny car, I finally came up with two options. I can either buy a different amp that can power the rear speakers as well as the sub, or I can get a tiny amp that just powers the components. The best little amp that I've found is the Rockford Fosgate PBR300X2 and the PBR500X1. The stereo 300W model is small enough that it would fit under the glove compartment tray. There are lots of models that can power two speakers a sub, the problem becomes finding one small enough to fit in my space... Remember my design goal was to make it as blended into the car as possible.
Here's my new enclosure design. I've given up on the dual sub design to my the enclosure easier to build and to support a larger amp if necessary. Also, I was dumb and bought a SVC sub instead of a DVC so I'm stuck at 4 ohm and unless I bridge an amp, 4 ohm loads are not very efficient. Oh well... The new design also lets me mount the component speaker cross-over to the sides. The volume shown assumes a 15% increase by using batting. The sub isn't more centered so that I can mount the light on the front.
On a separate note, the hood clearance issues have been fixed! Pictures and an explanation later!
Subscribe to:
Posts (Atom)