Tuesday, August 21, 2012

Been A While, Need To Give an Update

A lot has happened since my last post.  First thing, had the starter looked at.  It's a rebuilt Napa one, but the guy said it was in good shape.  He replaced some bushings and such, so it should be good to go.

Next, I finished up getting the car ready to accept the engine and transmission.  New battery cables ran with an additional battery cable for the new electric fans, transmission kickdown, and electric water pump.  Finished painting the engine bay.  Fixed up the vapor canister bracket and made some new lines for it using stainless AN fuel line.


With the new wiring ran, I was able to install the new transmission tunnel insulation.  Installed new clips for it by drilling out the old ones.  Used an aluminum riveter to install the new ones.  With that, the engine was ready to be put in.

My dad came over and helped me get started.  First we got the engine onto the engine hoist and installed the flex plate.  We had to fill the torque converter with a quart of transmission fluid and then install it carefully on the transmission.  Then I used my dad's motor cycle jack to get the transmission up to the motor.  Had to use a regular jack to level out the engine.  My wife and I then proceeded to bolt the transmission and engine together.  Getting the flywheel and torque converter was a treat....    Few more steps and the engine assembly was together and ready to go into the car.


Got some of the accessories installed on the transmission.  The shifter kit went on easy, so did the TV cable. Unfortunately the dipstick was broken inside the package.  Contacted the manufacturer, Lokar, and they had a new cable to me in two days.  If you've never dealt with Lokar, I highly recommend them.  Both times I've talked to them, they've been really helpful.  The last bracket to put on ended up not working.  It's for the steering column lock cable.  Turns out that's something that always doesn't work and people just make their own.  I'll be making my own, but have lots of other stuff to work on first.


So the engine is finally in the car!!!  It honestly looks really good.  Unfortunately I have a few issues to work out.  First, the serpentine belt touches the passenger side upper control arm.  Luckily it was an easy fix.  All I needed to do was get the A/C compressor to be closer to the cylinder head covers and March Performance has shorter rods that I can get (unfortunately not exchange for, oh well).  The second problem is that the carburetor covers up the vacuum port on the intake manifold.  The carb manufacturer, Quick Fuel, said I should connect my brake booster to that port instead of using the port on the carb itself.  I'm able to solve this problem by adding a 1/2" carb spacer, which leads to another potential problem.  The air gap intake manifold adds a lot of height.  Luckily the new carb is shorter than the old one and my air cleaner base is a drop base.  However, it was going to be very close to hitting the hood without the 1/2" spacer, we'll have to see what happens there (just ordered the spacer).

The next problem is really annoying.  The position of the dipstick changed on the new engine.  It's now on the drivers side and it's horribly difficult to get to because of the brake booster.  It sucks, but it's usable so I'm leaving it for now.  The last problem is the lower radiator hose.  I have no idea how to route it around the serpentine belt.  The hose I have can't make a 90 degree turn and then angle back to avoid the belt.  Not sure what to do here yet, but I think I'm going to wait until the radiator is in to figure it out.


Several issues can be fixed with one expensive upgrade.  If I replace the brake booster with a hydroboost system that runs off the power steering pump instead of the engine vacuum, then I eliminate the need to have the need for a fitting in the intake manifold which means I don't need the carb spacer.  If I don't need a carb spacer, there's less chance of hitting the hood with the air cleaner.  The other benefit of the hydroboost is that it's much smaller.  This means I wouldn't have issues with the dipstick or getting to the windshield washer fluid tank and alarm wiring.  Going to a 383 stroker engine with a larger cam likely reduced the amount of vacuum the engine produces, so going to the hydroboost is also less risky in that aspect.  Could also switch to electric lights to remove some of the drain on the vacuum, but that's more expensive (have someone getting me specs for the McSpeed bracket kit).  I think the right answer is to get the hybroboost system.  For now I'm going to get things working like this (I can deal with the dipstick issue), and if I have brake and/or hood clearance issues I'll invest in the hydroboost system with money from selling the old parts.

While I was trying to figure out the steering column lock cable bracket, I decided to work on other parts of the car.  I got the passenger side door pretty much put back together.  Got all my ducts modified for the new A/C system and installed the A/C control electric conversion.  However, I ran into a large problem with the Vintage Air SureFit System...  The evaporator doesn't fit.  There's a bracket for some additional braces on the convertible models that included A/C that prevent the evaporator from being installed correctly.  I've contacted Vintage Air and they said they're aware of the issue, but haven't given me any information on what to do to fix it.  In my opinion, the best answer is for them to exchange my evaporator for one of their smaller universal units and then give me the tubing to hook it up to the kit I already have.  I have a feeling they're going to tell me to cut the bracket out (which I do not want to do).


Friday, July 27, 2012

The Transmission Has Arrived

Well, the transmission showed up via freight on a pallet in a wooden box.  There's a lot of stuff in the box...  It's a little intimidating reading through the packet of information.  In order to get the transmission properly installed, the entire engine and drive train have to be installed.  The reason being that once it's installed, a series of pressure tests have to be run and the pressures called in to the company (BTO).  Once the pressure and temperature tests are called in, only then does their warranty apply.  The pressure tests have to be run in every gear, so the parking brake must work...  So here's the order things will happen...
  • Finish cleaning and painting the engine compartment
  • Install the new battery post in the engine compartment
  • Put the transmission insulation in place
  • Put the engine and transmission together, and then install in car
  • Mount differential
  • Clean and recondition driveshaft and halfshafts
  • Rebuild parking/emergency brake
  • Install new radiator
  • Finish A/C system installation (needs to be done to put interior back together)
  • Replace remaining bad hoses and lines
  • Perform transmission pressure tests and adjustments
Once all that's done, the car will be driveable, but there's still some things left to do (mainly the stereo for this year).  This winter break will hopefully be the time to do the suspension.  I'm on a notification list for when the stage kit I want has the option for aluminum lower control arms (upper arms are already available).

Also installed the serpentine belt today...  For some reason, our first measurement was off by more than 1/2" so the belt I ordered did not fit.  No one carried the size in town so I had ordered it through JEGS.  However, the next two sizes up are carried by O'Reilly so I went and picked them up today.  And the
winner is.... 81"!  It's the Gates Micro-V AT K060810 81-5/8" OC and it just barely clears the water pump.  Had to remove one of the idler caps to get it on, but the next size up was too big and was causing lots of adjustment in the tension arms.


Wednesday, July 18, 2012

Google Template is Messed Up

So don't know what's going on today, but the template for this blog seems to be messed up.  There's like a sizing calculation that's wrong.  I can adjust the width of the background and the width of the menu, but I can't adjust the width of the posts (it's auto calculated).  As a result the navigation is showing up below the posts.  I tried quick to edit the template, but it didn't work.  Guess I'll just have to wait for Google to fix it...

Ordered the last of the parts for the engine.  Fuel line to pump fittings and hose, starter bolts, bellhousing bolts, serpentine belt (Gates 6-rib at 80.6"), heater core fittings, and of course u-joints with straps.  The u-joints will show up today.  They're Spicer solid body (no maintenance) 1350 joints.  The conversion u-joint (1350 to 1310) only comes with a grease fitting.  When I was figuring out the status of the current u-joints, I noticed that one of the halfshafts was installed wrong.  It didn't really make a difference in the functionality, but it'll be good to have it on there right.

So the heater core situation is interesting...  Since I changed to that CVR electric water pump, I lost the place that you would normally connect the heater core.  However, the pump does have the bypass port on top (unlike many electric pumps).  It took me a while to figure out what that top port was actually for and what it was called, but once I did, it was easier to investigate how to solve my problem.  I sent messages to Vintage Air (A/C system company) and to Summit Racing to see if they had any suggestions on what to do, but after a few days of no responses I did the investigation myself.

It turns out that the lines coming into the water pump are all return lines (including the bypass port).  The only outputs are in the arms that bolt to the engine block.  The bypass port is normally used to go from the intake manifold to the water pump so that when the thermostat is closed coolant still circulates by flowing into the water pump (the thought is that the engine will heat up faster).  More often than not, this port is simply plugged.  Since the missing heater core hook-up is also a return path for coolant, there should be no issues with using the bypass port instead.  In fact, the two fittings are the same NPT (pipe fitting) size.  I ordered an aluminum 45 degree NPT to hose barb fitting to connect up the hose.  I should mention that the old fittings were NOT reusable...  The fitting on the old aluminum intake manifold was steel!  Steel and aluminum do not mix!  The steel was rusted.  As for the fitting on the old pump, it was steel as well and straight (at least the pump wasn't aluminum) so it would not have been good for my new aluminum pump or direction of hose.

Friday, July 13, 2012

Glad that worked...

I went and bought a bolt extractor set from Home Depot tonight.  I already had a cheap set from Menards but wasn't confident in it.  At first the new bolt extractor set didn't work.  So I grabbed a small drill bit and tried the cheap set (one of the extractors actually sheered off inside the stud, like I said, cheap...).  Neither seemed to work so I drilled the stud further and tried the new set again.  This time it worked!  I was extremely relieved...

I'd gotten a pulley installer from Autozone to finish putting the pulley on (as suggested by March).  I did ask them why they don't just pull the cheap, non-hardened stud installer and instructions before shipping it out.  They responded that the kit comes in bulk from the manufacturer that way (Tuff Stuff).  The rep also said, "I haven't heard of the bolt breaking in the past and it may be due to people not using it".  Whatever...  I just thought they might want to help people in the future...

In order to get the pulley on the power steering pump far enough, I ended up using two 5/8" extra thick washers (they're actually grade 8 washers).  The washers were able to fit around the pump's shaft and allow the installer to keep pushing.  Before figuring out the washers would work, I pretty much stripped the pulley installer's bolt.  If you ask me, the pulley was just poorly designed if that's what it takes to get it on all the way.


After getting all the bolts tightened up on the serpentine brackets, I cleaned up and decided to move on to the engine mounts.  The original engine mounts were steel with rubber.  Most of the rubber was gone or extremely degraded so I decided to get some new ones.  It was between Energy Suspension and Prothane mounts.  I went to Sperry's the other day to pick up my old Quadrajet carb and when I was there I saw some Energy Suspension stuff sitting on the counter.  After seeing that, I decided to go with the Energy Suspension polyurethane mounts (I'd read you couldn't go wrong with either on a few forums).  The mount kit comes with both the transmission and engine mounts.  These were a little more expensive than Prothane and I didn't get the chrome/polished ones.  It was like $60 more for the chrome/polished and you can barely see the things....  The mounts don't come with bolts so I went with ARP bolts.  Pretty much all the bolts on my engine are made by ARP.


Wednesday, July 11, 2012

Maybe the Serpentine Kit will Work!

So I got an email back from March Performance.  They suggested just removing one of the added idlers.  Not sure if it would be better to remove the passenger or driver side idler.  If I remove the driver side I get the normal amount of surface contact on the A/C compressor's pulley, but if I remove the passenger side, I get more clearance over the water pump and more bite on the alternator.  Removing the passenger side also loses a little of the A/C compressor bite, but not a lot.  I could leave the driver side idler on and just go over the top, but that seems a little silly since it wouldn't really be providing any useful functionality.  Anyway, I took a couple pictures with twine going around the system, so we'll see what March thinks.

As for the power steering bracket...  They did update their design to eliminate the third mounting hole.  They just haven't updated the instructions yet (and apparently didn't tell the packaging department since they sent 3 bolts).  Still waiting to hear back from them about whether or not to shim the bracket out just a tiny bit with stainless steel washers to allow the pump to be attached while the bracket is attached to the motor.  As it is I can't squeeze the pump on there.

Anyway, once I hear back on those final thoughts, I'll redo all the bolt with some blue loc-tite.  Right now they're just on hang tight.

Oh!  And the other big news!  I got the transmission ordered today!  It's a 200-4R automatic transmission with overdrive, so I won't have to change my driveshaft length.  I'll just need to file my mounting holes a bit in my cross member.  I'm getting it through Bowtie Overdrives (BTO) and it'll be a level 2 which means they've beefed it up to handle 450 HP and 500 ft-lbs of torque.  I'm getting the complete setup through them.  The shifter update, the TV update (not television), braided stainless steel cooler lines, dip stick, wiring harness, and torque converter.  Scott Sperry had recommended a 1800 stall torque converter, but when I mentioned that to BTO they didn't think that was enough stall.  I sent them the specs of my cam and they thought 1800 would be alright for street cruising, but still thought I should go with the 2200.  So that's what I did...  Anyway, that should show up in about 2 weeks!  Now just need to get the u-joints...

Pretty soon there will be no excuses to get this thing working again!  Getting excited!


Monday, July 9, 2012

Put the Compressor and Alternator On

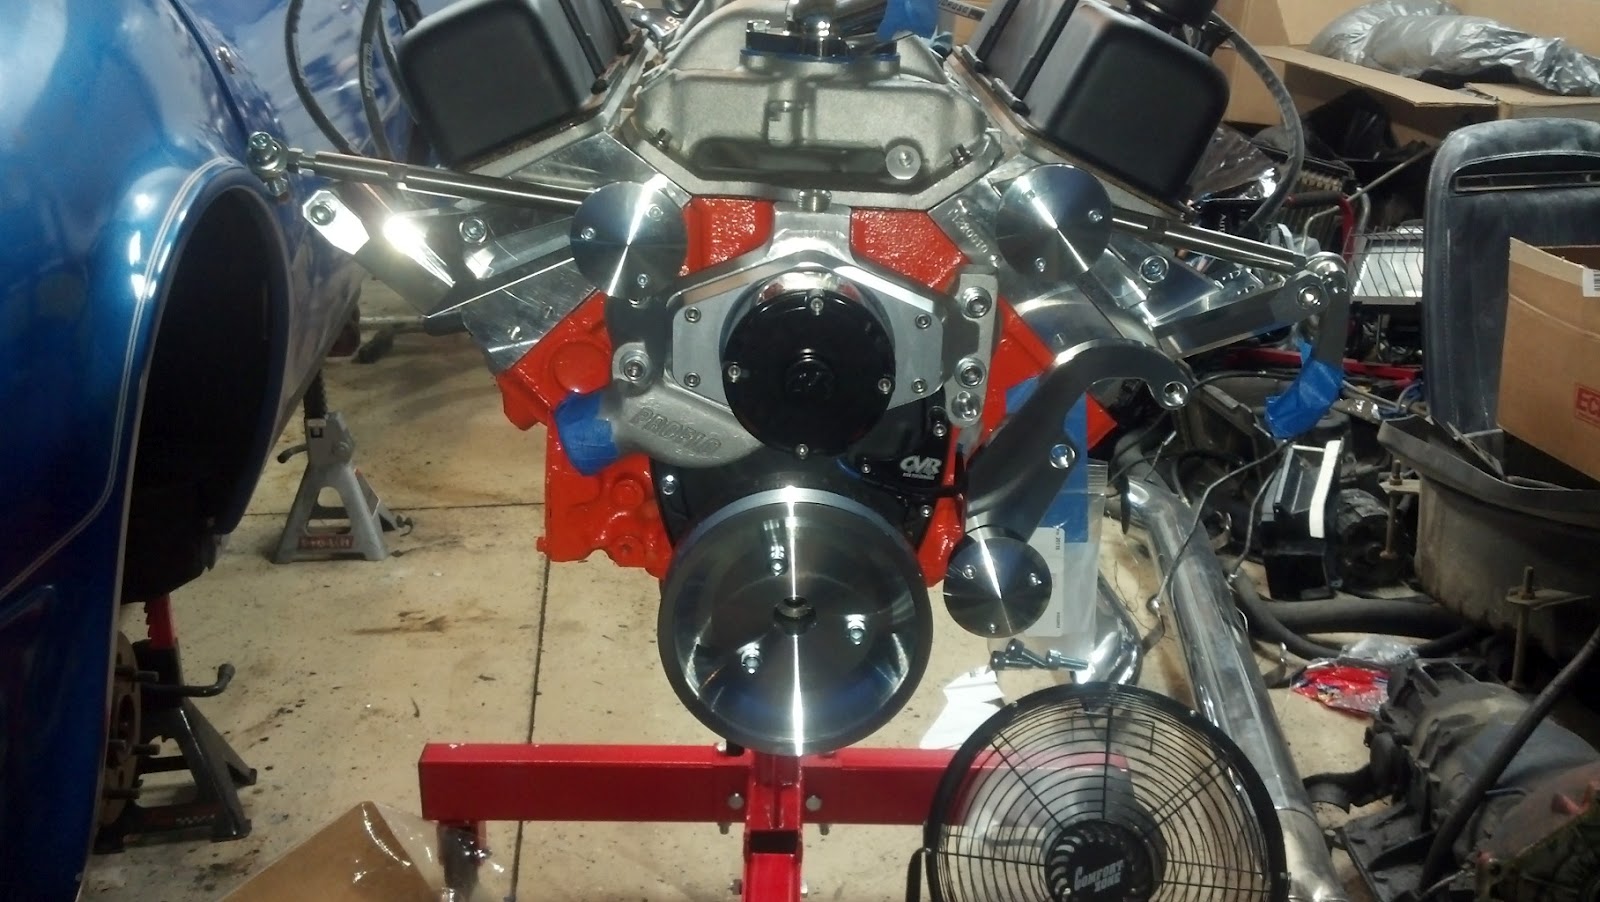
I wasn't sure if I should put them on or not, but I decided to put the A/C compressor and alternator on their brackets.  Since something will probably have to change with the A/C bracket because of the idler being too low, it's possible I'll just have to take it back off.  I really just wanted to see what it was going to look like all together...  Everything is on except the power steering pump.  The pump was so tight that I would have had to put it on before the bracket was screwed down to the engine.  I sent another email to March before attempting that.

So the compressor has a nose cap and the alternator got a new pulley (6 groove instead of v-belt) and a nose cap.  The nut for the alternator is put on insanely tight!  I spent all morning on Sunday trying to get the stupid thing off.  I had to go out and buy a 15/16" socket.  First my neighbor and I tried using an allen wrench and the socket with a pipe wrench, but we couldn't get the thing off.  After reading some tips online, we wrapped a belt around the pulley, clamped it as hard as we could in my vise, and then start popping the socket with a breaker bar (since we didn't have an impact wrench).  Once we did that it came loose after two tries.  Unfortunately while we were trying to get the nut off we dinged the fan on the alternator.  It's not really a big deal because it won't cause the fan to hit anything, but it's definitely noticeable since the fan has a flat polished front.  Debating about replacing it with a billet aluminum fan or not for $47.  Is the look of a fan really that important?  Only the wife will tell... =)


Saturday, July 7, 2012

Problems with the Serpentine Kit

I decided to put the water pump and the serpentine kit on today.  The electric water pump was pretty straight forward to install (some gasket sealer on the gaskets and 4 bolts).  I also put on a new water neck, Fel-Pro gasket, and 180 degree Superstat thermostat.  As instructed by the mechanic, I drilled a tiny hole in the metal on the edge of the thermostat to make sure that air can always pass through.  The smallest hole that I could drill was 1/16" so hopefully that's not too big.  I did some searching and seems like I could have gotten smaller if I had a micro bit set because they come with a special pin chuck.  Just ordered one... I'll have to give Sperry a call and find out if I wrecked my new thermostat or not.  Oh well, they're only like $8.

Next I moved on to the March Performance Deluxe Outward mount serpentine kit.  The crank pulley was just three bolts.  Three other main parts went on before I stopped...  First I put the alternator arm on, then the power steering bracket, and then finally I put the A/C arm on.  Each bracket has an idler.  The idlers on the alternator and A/C brackets were added so that I could have the electric water pump.  Unfortunately, it appears the idlers are not in the right spots.  The belt will end up hitting the water pump.  One other odd thing is the power steering pump bracket only has two holes in it.  It came with three bolts and the instructions show the bracket having three holes.  The new remote reservoir power steering pump has three mounting holes on it.  I don't know whether they sent the wrong arm or what.

Just sent March an email detailing the problems.  We'll see what they say to fix this...